Well here we go! Been talking about it long enough. Time to show some pics! Been building this FX for most of the winter. Collecting parts and doing my research. This is entirely EXPERIMENTAL! Do not try this unless you are willing to take a chance. I do not know if many of my ideas will work.
I don't have any before pics, but it is a Huffy Broadlawn that I got from Brian G in South Dakota. I am running a 28 OHV Briggs built by Don G. I am turning the engine on it's side to avoid using a right angle gear box.
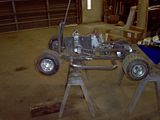
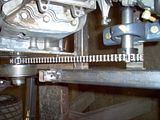
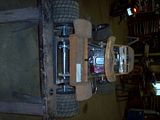
Here are a few shots of the chassis. I built a new frame out of all new 1 1/4" box iron. Using a E.C Dist front axle.

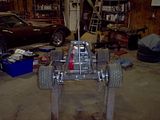
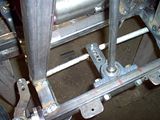
The front end is fully adjustable. So I decided to go with adjustible cassets in the rear.
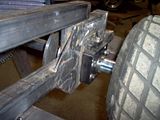
Here is my set up for my steering. Not going to use the loop that comes with the EC axle. Those are not the tie rods I am using. They are old ones I am using for mock up. Sorry I don't have a better shot of it!
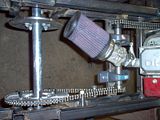
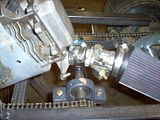
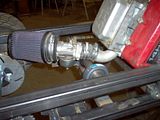
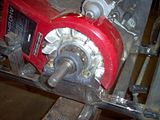
Next we have some shots of the clutch and jackshaft. Also the carb and manifold. The clutch is a Noram clutch that everyone recommends. I have modified it to run it inboard. The jackshaft is a piece that I had my local machine shop build. I is 1" that I had the ends turn down to 3/4" and keyed for the gears. I did it this way so I could use a bolt in the end of the shaft to hold the gears on and not have to rely on the set screws in the gears. The manifold I cut with a hack saw and turn it to the position I needed it so the carb would set level. I used a piece of radiator hose to put it back together. I am going to run this set up first to see how it runs. If I need more HP I'll go to a tilly or a mikunni and get a manifold built. You can also see the 1/4" plate that I used to mount the engine.
This next shot is the bearing and shaft I am using to supprort the flywheel side of the engine. No I can't tell you what it is made of! If this works I'll be offering them for sale! It won't be that long. I had it made long so I had some extra material to work with. I haven't decided how I'm going to tighten it yet. May weld a nut on the end, or have the machine shop mill it so I can put a wrench on it.
Like I said EXPERIMANTAL!
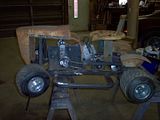
Next are some pics of how it will look once all the tin work is on it. The hood is mounted. The seat I just drilled and am bolting it to the frame. It needs to come off for maintenace. The fenders will hold the fuel tank and pump. Not sure how I'm going to finalize them yet.

Currently working on getting my handlebars mounted and getting my chain tensioners done.
More pics later!
Paul


